> For the complete documentation index, see [llms.txt](https://docs.acestudio.ai/llms.txt). Markdown versions of documentation pages are available by appending `.md` to page URLs; this page is available as [Markdown](https://docs.acestudio.ai/project/mixing/effects.md).
# Effects
Build and manage effect chains for tracks and the master bus.
Every track in ACE Studio — and the master bus — has an **FX panel** where you build a chain of effects.
The effects themselves are documented in the pages under it:
* [**Built-in Effects**](/project/mixing/effects/built-in-effects.md) — the effects ACE Studio ships with: EQs, dynamics, and reverb.
* [**Third-Party Effects**](/project/mixing/effects/third-party-effects.md) — using your own VST3 / AU plug-ins on the same chain.
* [**Room Effect**](/project/mixing/effects/room-effect.md) — spatial positioning for vocal tracks, separate from the FX chain.
***
### Opening the FX panel
* Select a track and switch to the **FX** tab.
* The panel header shows the track you are editing.
* It shows the track colour, name, and index, or **Master** for the master bus.
### Adding an effect
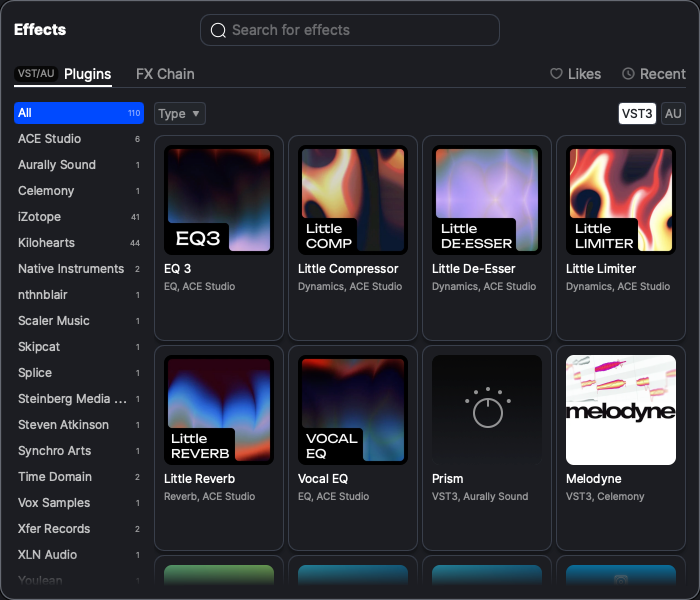
Click **+ Insert** at the bottom of the insert list. This opens the **FX Library**, where built-in effects, your third-party plug-ins, and saved FX chains live side by side.
* **Vendor list** — the column on the left groups effects by manufacturer, with a count next to each name. **All** is selected by default. ACE Studio's built-in effects live under the **ACE Studio** vendor.
* **Type** — filter by category, such as EQ, Dynamics, or Reverb. Only VST3 plug-ins can be filtered this way.
* **VST3 / AU** — on macOS, switch between plug-in formats. ACE Studio remembers your choice.
* **Search** — filter the whole list by name.
* **Likes** — effects you have liked. Hover a card and click the heart to like it.
* **Recent** — effects you used recently.
* **FX Chain** — our pre-made and your saved FX chains.
Each card shows the effect's image, its name, and a subtitle with the format, type, and vendor, such as *VST3, EQ, FabFilter*.
For plug-in-specific details such as formats and plug-in windows, see [Third-Party Effects](/project/mixing/effects/third-party-effects.md).
The effect is added as a **chip** in the insert chain.
### The insert chain
Inserts process **in series, top to bottom**.
The signal flows through the first effect, then the second, and so on.
* **Reorder:** drag a chip up or down.
* A white line shows where it will land.
* **Multi-select:** click a chip to select it.
* Cmd/Ctrl-click adds more chips.
* Shift-click selects a range.
* **Right-click** a chip for **Copy / Paste / Delete / Select All / Bypass / Activate-Deactivate / Save FX Chain…**.
### Chip controls
Every effect chip has the same header controls:
* **Power button** — the small round icon on the left. It turns the effect on or off.
* The colour shows the state:
* **Blue** — active and processing.
* **Yellow** — bypassed.
* Audio passes through untouched.
* Bypass is toggled from the right-click menu.
* **Grey** — deactivated.
* **Effect name** — click to select the chip.
* **Expand / collapse chevron** — on built-in effects, this opens controls inline inside the chip.
* Click again to fold them away.
* Third-party plug-ins open in their own window instead.
{% hint style="info" %}
**Deactivate vs. Bypass.** *Deactivate* removes the effect from the signal path entirely. *Bypass* leaves it in place but skips its processing. Both keep your settings.
{% endhint %}
### Editing values
Inside an expanded built-in effect, the controls behave consistently:
* **Knobs** — drag up and down, or along the diagonal, to change the value.
* **Type a value** — double click a knob's number to enter an exact value.
* **Reset** — double-click any knob to return it to its default.
* **Threshold lines** — on Compressor and De-Esser, drag the line directly on the meter.
### Saving a chain
Once you dial in a chain you like, select the effects, right-click and choose **Save FX Chain**.
This stores the whole chain, including effects and settings, as a reusable preset.
Saved chains appear in the FX Library under **FX Chain**.
You can then apply the full setup to another track.
Saved chains are stored in a local folder shared across your projects.
To rename, delete, or share them, choose **Manage in Finder** on macOS or **Manage in Folder** on Windows.
---
# Agent Instructions
This documentation is published with GitBook. GitBook is the documentation platform designed so that both humans and AI agents can read, navigate, and reason over technical content effectively. Learn more at gitbook.com.
## Querying This Documentation
If you need additional information that is not directly available in this page, you can query the documentation dynamically by asking a question.
Perform an HTTP GET request on the current page URL with the `ask` query parameter, and the optional `goal` query parameter:
```
GET https://docs.acestudio.ai/project/mixing/effects.md?ask=&goal=
```
`ask` is the immediate question: it should be specific, self-contained, and written in natural language.
`goal` is optional and describes the broader end goal you are ultimately trying to accomplish on behalf of the user. GitBook uses it to tailor the answer towards what is most useful for that goal.
The response will contain a direct answer to the question and relevant excerpts and sources from the documentation.
Use this mechanism when the answer is not explicitly present in the current page, you need clarification or additional context, or you want to retrieve related documentation sections.