> For the complete documentation index, see [llms.txt](https://docs.acestudio.ai/llms.txt). Markdown versions of documentation pages are available by appending `.md` to page URLs; this page is available as [Markdown](https://docs.acestudio.ai/docs/product-wiki-zh/gong-cheng/arrangement-in-canvas/clips/audio-warp.md).
# 音频 Warp
在 ACE Studio 中使用变形标记对音频片段进行拉伸,并将其对齐到工程的曲速。
## 什么是音频 Warp
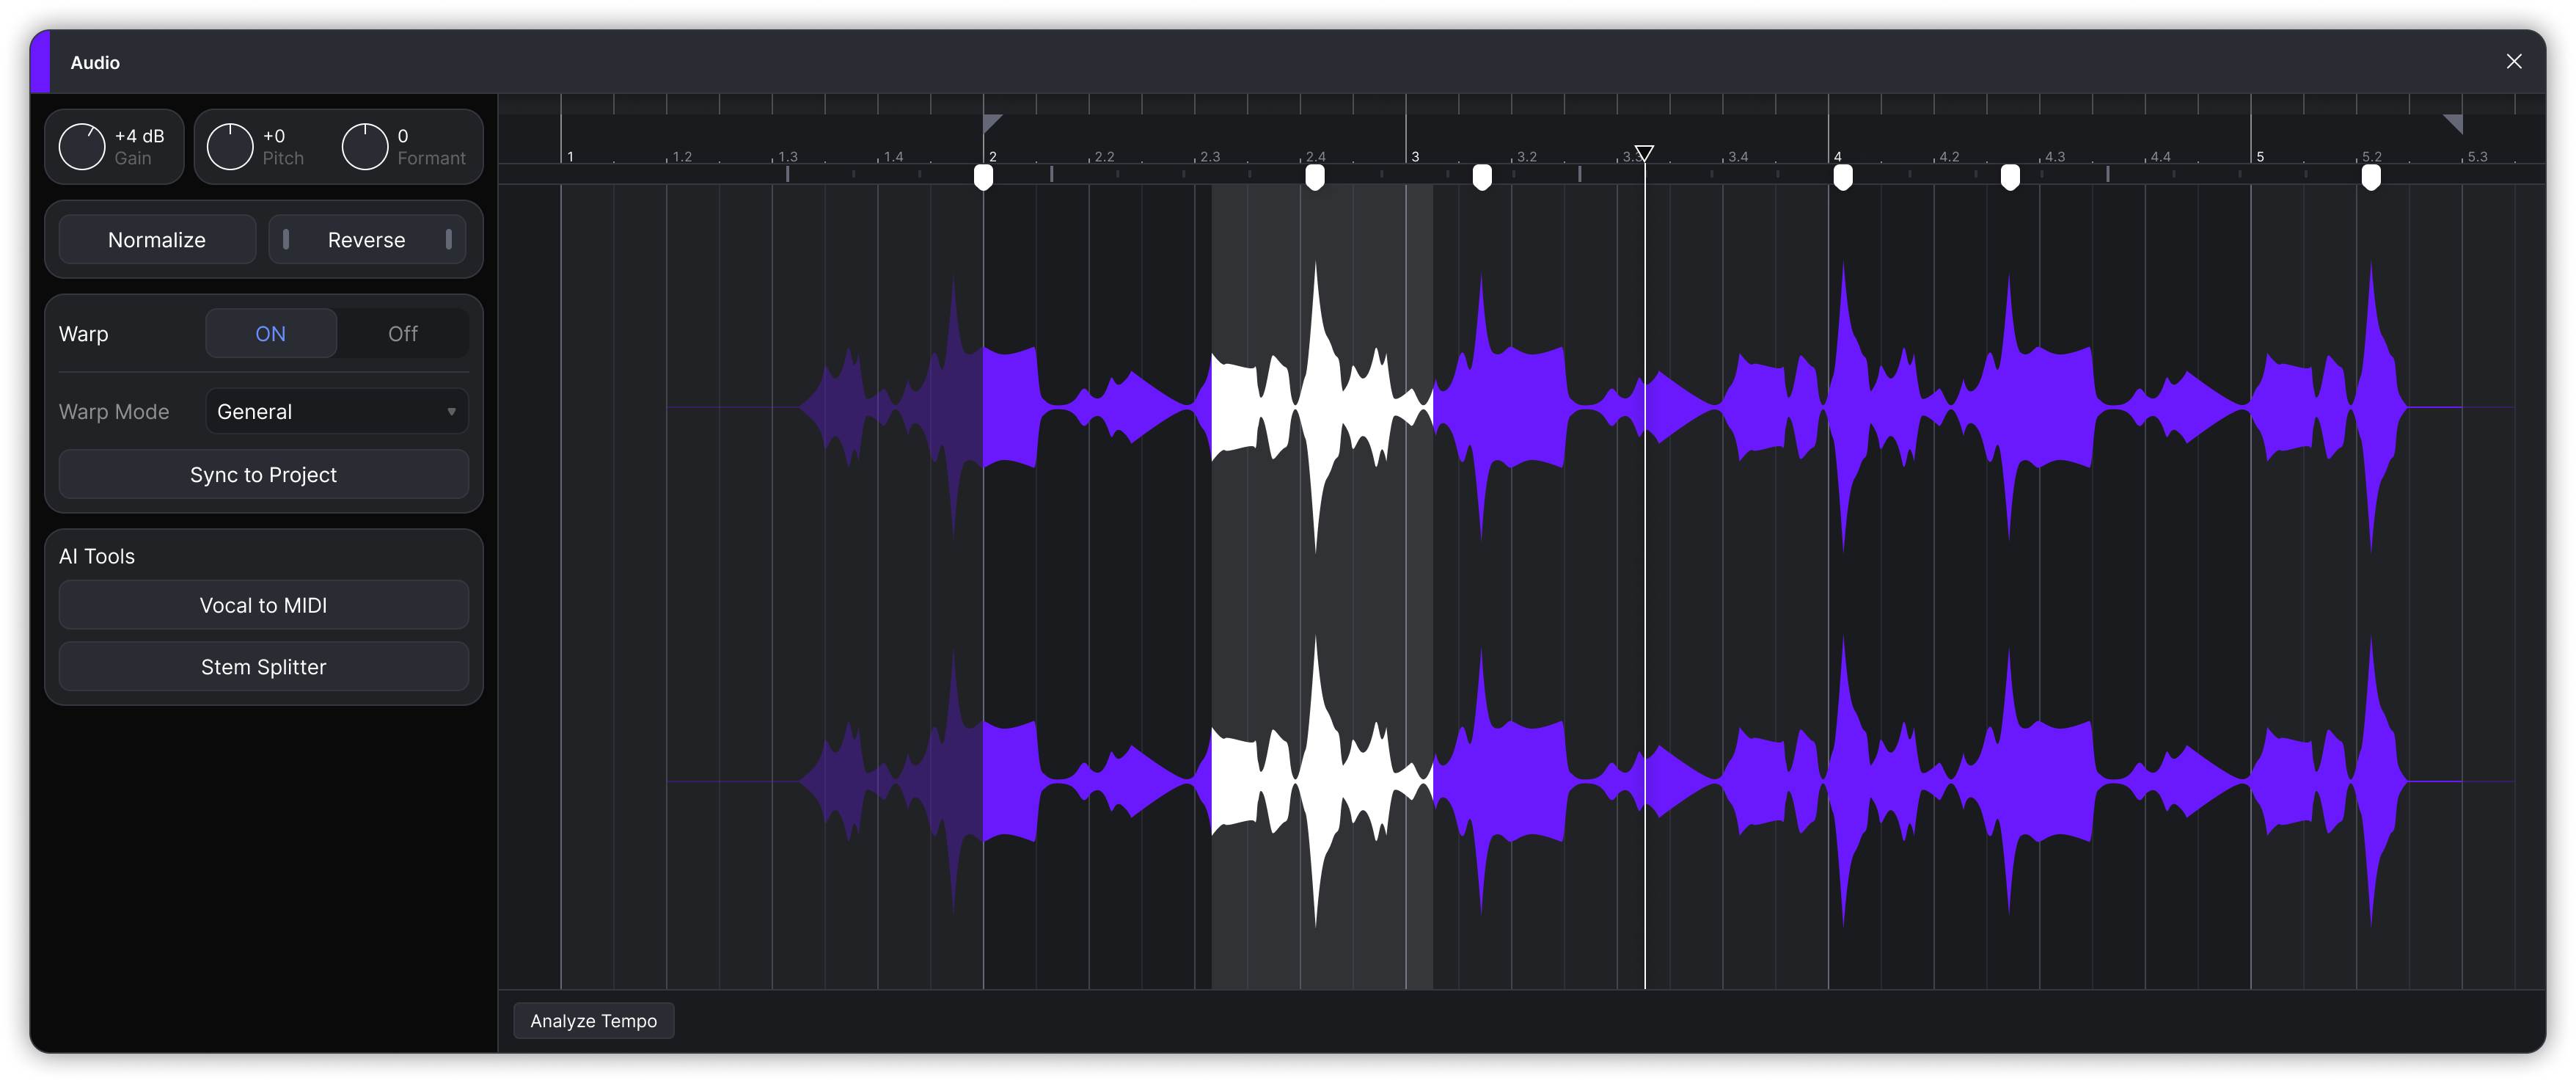
音频 Warp 可在不改变音高的情况下,对音频片段进行时间拉伸或压缩。将 Warp 标记放置在波形上并拖动到网格位置,或让 ACE Studio 一键将片段与工程的曲速对齐。
音频 Warp 位于音频编辑器中。双击音频片段即可打开。有关音频编辑器中的其他控件,请参阅 [剪辑编辑器](https://docs.acestudio.ai/docs/product-wiki-zh/gong-cheng/arrangement-in-canvas/clips/clip-editor.md).
## 开启 Warp
默认情况下,每个导入或生成的音频片段都处于关闭 Warp 状态。点击 **开启** 旁边的 **Warp** 即可将其开启。
开启 Warp 后:
* 首次开启时,会在片段起始位置创建一个 Warp 标记。
* 检测到的节拍和强拍会显示在波形上方。
* Warp 标记会遵循工程的音乐时间,因此更改工程曲速会重新 Warp 片段。
关闭 Warp 后:
* 片段将以未 Warp 的状态播放,工程曲速变化不会影响它。
* 你的 Warp 标记会被隐藏但仍会保留,下次开启 Warp 时将恢复显示。
* 如果未 Warp 的音频比片段更短,片段结束位置会回移至音频结束处。
### Warp 模式
从以下位置选择音频的拉伸方式: **Warp 模式** 菜单:
* **通用** – 默认选项,适用于大多数素材。
* **独奏** – 适用于单音素材,例如单个歌手或主奏乐器。此模式下无法使用共振峰。
* **语音** – 适用于口语。此模式下无法使用音高和共振峰。
## Warp 标记
Warp 标记会将音频中的一个点固定在时间线上的某个位置。拖动标记时,它与相邻标记之间的音频将被拉伸或压缩,而相邻标记之外的音频会保持原位。
### 创建标记
* 在波形任意位置双击。标记会精确放置在点击位置,不会吸附。
* 将鼠标悬停在波形上方检测到的节拍或强拍上,然后点击建议的标记。
* 右键单击并选择 **插入 Warp 标记**。快捷键: Ctrl/⌘Command + I.
### 移动标记
向左或向右拖动标记。标记会吸附到工程网格。按住 Ctrl/⌘Command 并拖动可关闭吸附。标记不能拖过相邻标记。
* 有多个标记时,拖动其中一个只会改变它与相邻标记之间的音频。第一个和最后一个标记之外的音频会随标记移动,但不会被拉伸。
* 只有一个标记时,拖动它会在片段内滑动整个音频。片段在时间线上的起始和结束位置不会改变。
### 选择标记
点击标记以选中它。按住 Ctrl/⌘Command 并点击可将标记添加到选区,或按住 Shift 并点击以选中其间的所有标记。
### 删除标记
* 选中标记并按下 Delete 或 退格键.
* 双击现有标记。
* 右键单击标记并选择 **删除变形标记**.
选择 **重置所有变形标记** 以清除所有变形编辑,并从片段起点处的单个标记重新开始。
### 设为片段起点
右键单击某个位置并选择 **设为片段起点** 将其设为片段的新起点。片段在时间线上保持原位,此点之前的音频将不再播放。新的起点处会放置一个变形标记。现有标记会被保留,包括新范围外的标记。
## 同步到工程
点击 **同步到工程** 一次性将片段与工程的曲速对齐。ACE Studio 会用每个检测到的重拍上的一个标记替换片段的变形标记,将第一个重拍吸附到最近的小节线,并将后续重拍与后续小节对齐。如果变形功能之前关闭,系统会自动将其开启。
如果片段已经有变形标记,ACE Studio 会在覆盖前请求确认。
{% hint style="info" %}
同步到工程需要检测到重拍。如果音频中未检测到重拍,则不会有任何变化,并会显示相应提示。
{% endhint %}
## 在画布上对整个片段进行变形
在画布上,拖动音频片段标题栏的任一端即可修剪它。按住 Shift 拖动标题栏末端时,改为按比例拉伸或压缩整个片段。现有变形标记会保持其相对位置。
如果变形功能之前关闭,系统会自动开启,并清除之前的变形编辑,拉伸将从未变形的音频开始。
## 拍点、强拍和曲速
ACE Studio 会自动分析每个导入或生成的音频片段的拍点和强拍。开启 Warp 时,它们会显示在波形上方,并用于建议标记、同步到工程以及片段的 BPM。
* 对于时长 1 分钟或更长的音频,在添加片段时会计算 BPM。它显示为 **已分析的 BPM** 音频编辑器下方以及片段右上角。
* 对于较短的音频,请点击 **分析曲速** 在音频编辑器下方进行计算。
BPM 值仅供参考。它不会改变片段的播放或 Warp 处理。如果分析结果不准确,您可以手动编辑该数值,或点击旁边的清除按钮将其移除并恢复为 **分析曲速** 按钮。拍点、强拍和 warp 标记不受影响。
{% hint style="info" %}
由音轨分离创建的 Stem,是从你听到的变速处理音频中分割出来的。它们会继承片段的 BPM,但初始状态下 Warp 处于关闭状态,且不包含 Warp 标记。
{% endhint %}
---
# Agent Instructions
This documentation is published with GitBook. GitBook is the documentation platform designed so that both humans and AI agents can read, navigate, and reason over technical content effectively. Learn more at gitbook.com.
## Querying This Documentation
If you need additional information that is not directly available in this page, you can query the documentation by asking a question.
Perform an HTTP GET request on the following URL with the `ask` and `goal` query parameters:
```
GET https://docs.acestudio.ai/docs/product-wiki-zh/gong-cheng/arrangement-in-canvas/clips/audio-warp.md?ask=&goal=
```
`ask` is the immediate question: it should be specific, self-contained, and written in natural language.
`goal` is what the user is ultimately trying to achieve, the reason they need the answer. Sharing it helps GitBook give you a better, more relevant answer. A goal is most helpful when it describes the outcome the user wants rather than restating the question. For example, with `ask=how do I create an API token`, a goal like `automate deployments from our CI pipeline` lets GitBook tailor the answer to that use case.
The response will contain a direct answer to the question and relevant excerpts and sources from the documentation.
Use this mechanism when the answer is not explicitly present in the current page, you need clarification or additional context, or you want to retrieve related documentation sections.