> For the complete documentation index, see [llms.txt](https://docs.acestudio.ai/llms.txt). Markdown versions of documentation pages are available by appending `.md` to page URLs; this page is available as [Markdown](https://docs.acestudio.ai/docs/product-wiki-ja/purojekuto/arrangement-in-canvas/record.md).
# 録音
ACE StudioでオーディオとMIDIを直接トラックに録音します。
{% hint style="info" %}
録音前に、入力ハードウェア、サンプルレート、バッファサイズを設定してください。
詳細については、以下を参照してください [設定](/docs/product-wiki-ja/akauntoto/preferences.md).
{% endhint %}
録音を開始するには、 **録音** ボタンをトランスポート上でクリックするか、ショートカットキー R.
## 録音待機
ACE Studioでは、トラックを録音用に手動で待機させる必要はありません。トラックを選択するか、その上にマーカーラインを置くと、自動的に録音待機になります。
## 空のトラックから録音
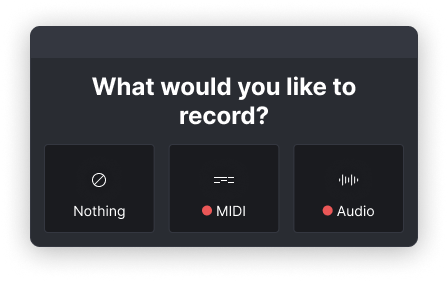
空のトラックを選択して録音を開始すると、オーディオまたは MIDI のどちらを録音するか選択するダイアログが表示されます。
## オーディオ録音
### 対象トラックを選択
選択した(フォーカスされた)トラックは自動的に録音待機されます。赤い点が、ミキサー内の [ミキサー](/docs/product-wiki-ja/purojekuto/mixing/mixer.md) またはトラックヘッダーに表示され、準備完了であることを示します。
### 入力とモニタリングを設定
適切な入力チャンネルを [ミキサー](/docs/product-wiki-ja/purojekuto/mixing/mixer.md)選択します。デフォルトでは、オーディオトラックのモニタリングはフィードバックを防ぐためオフになっています。 **モニター切替** (ヘッドホンアイコン)を [ミキサー](/docs/product-wiki-ja/purojekuto/mixing/mixer.md) ライブ入力信号を聞きたい場合、ミキサーで手動で有効にできます。
### 録音の開始と停止
再生ヘッドを開始したい位置に置き、 **録音** [録音] R ボタンをトランスポート上で押します。 R もう一度押すか、 Space を押すと、録音と再生の両方を停止します。
## MIDIを録音
### ボーカルトラックまたは楽器トラックを選択
ボーカルトラック、AI楽器トラック、または楽器トラックを選択します。選択したトラックは自動的に録音待機され、赤い点で示されます。
{% hint style="info" %}
注: 複数のトラックを選択した場合、録音待機になるのは最初に選択したトラックのみです。
{% endhint %}
### 入力とモニタリングを設定
適切なMIDI入力を [ミキサー](/docs/product-wiki-ja/purojekuto/mixing/mixer.md)選択します。MIDIトラックでは、モニタリングがデフォルトで有効になっているため、MIDIデバイスで演奏しながら音を聞くことができます。ヘッドホンアイコンは、モニタリングが有効であることを示します。モニター切替 [ミキサー](/docs/product-wiki-ja/purojekuto/mixing/mixer.md).
### 仮想MIDIキーボードの使用
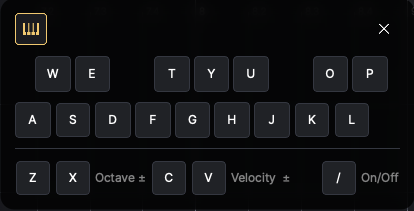
MIDIコントローラーがない場合は、コンピューターMIDIキーボードを仮想MIDI入力デバイスとして使用できます。メニューの Edit > 仮想MIDIキーボード(ショートカットキー /).
* キー A 〜 L は白鍵に対応します。キー WETYU は黒鍵に対応します。
* 押して Z / X でオクターブを下げ/上げます。
* 押して C / V でベロシティを下げ/上げます。
* 仮想キーボードが有効なとき、一部のアプリケーションショートカットは一時的に無効になります。
### 録音の開始と停止
再生ヘッドを開始したい位置に置き、 **録音** [録音] R ボタンをトランスポート上で押します。 R もう一度押すか、 Space を押すと、録音と再生の両方を停止します。
---
# Agent Instructions
This documentation is published with GitBook. GitBook is the documentation platform designed so that both humans and AI agents can read, navigate, and reason over technical content effectively. Learn more at gitbook.com.
## Querying This Documentation
If you need additional information that is not directly available in this page, you can query the documentation by asking a question.
Perform an HTTP GET request on the following URL with the `ask` and `goal` query parameters:
```
GET https://docs.acestudio.ai/docs/product-wiki-ja/purojekuto/arrangement-in-canvas/record.md?ask=&goal=
```
`ask` is the immediate question: it should be specific, self-contained, and written in natural language.
`goal` is what the user is ultimately trying to achieve, the reason they need the answer. Sharing it helps GitBook give you a better, more relevant answer. A goal is most helpful when it describes the outcome the user wants rather than restating the question. For example, with `ask=how do I create an API token`, a goal like `automate deployments from our CI pipeline` lets GitBook tailor the answer to that use case.
The response will contain a direct answer to the question and relevant excerpts and sources from the documentation.
Use this mechanism when the answer is not explicitly present in the current page, you need clarification or additional context, or you want to retrieve related documentation sections.