> For the complete documentation index, see [llms.txt](https://docs.acestudio.ai/llms.txt). Markdown versions of documentation pages are available by appending `.md` to page URLs; this page is available as [Markdown](https://docs.acestudio.ai/docs/product-wiki-ja/aijento/external-agent-access/chatgpt-for-desktop.md).

# デスクトップ版ChatGPT

デスクトップ版ChatGPT（ChatGPT Work & Codex）をMCP経由でACE Studioに接続します。

ローカル MCP（モデル コンテキスト プロトコル）サーバーを介して ChatGPT デスクトップ用を ACE Studio に接続し、AI ワークスペースから直接音楽プロジェクトの確認、整理、編集を行えるようにします。

{% hint style="warning" %}
**アプリとモードの互換性:**

* **ChatGPT Classic はサポートされていません:** 旧デスクトップアプリはローカル STDIO MCP サーバーに対応していません。最新の [ChatGPT デスクトップアプリ](https://help.openai.com/en/articles/20001276-moving-to-the-new-chatgpt-desktop-app).
* **標準チャットモードはローカル MCP に対応していません:** デスクトップアプリでは、標準 **Chat** モードは、ChatGPT Web / Developer Mode で設定されたリモート HTTP ベースのプラグインとリモート MCP サーバーのみに接続します。ローカルのデスクトップアプリケーションとは通信できません。
* **Codex または ChatGPT Work を使用してください:** どちらの **Codex** モードも **ChatGPT Work** もローカルマシン上で動作し、ローカル STDIO MCP サーバーを完全にサポートします。
  {% endhint %}

***

### 推奨: Codex による自動セットアップ

最新の ChatGPT デスクトップアプリは、基盤となる環境と MCP 設定を **Codex** と **ChatGPT Work**間で共有しているため、設定メニューを手動で操作する必要はありません。Codex にすべてを自動設定させることができます:

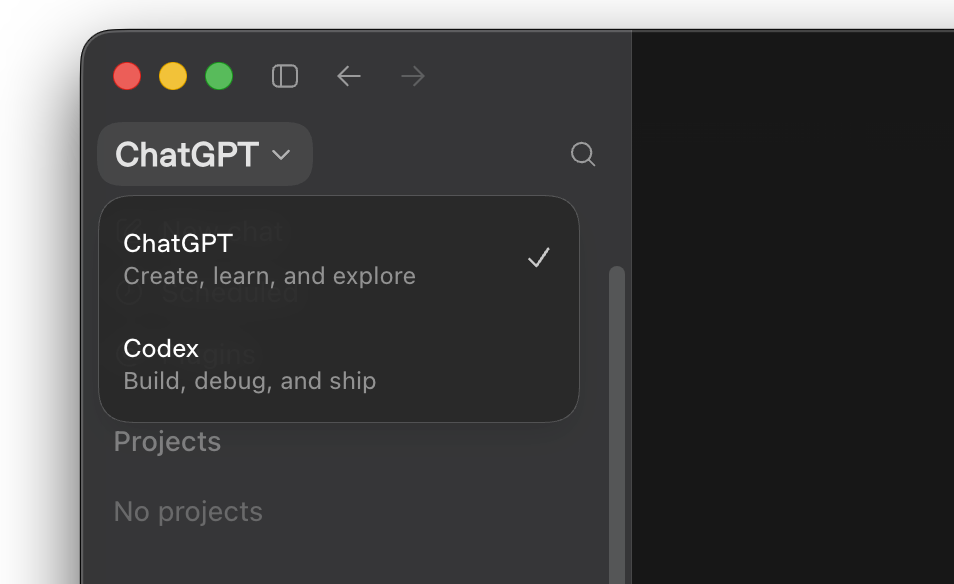
1. ChatGPT デスクトップアプリで、左上のモードセレクターを開き、次に切り替えます: **Codex**.
2. 次をコピーし、 **自動セットアップ用プロンプト** から [外部エージェントアクセス](/docs/product-wiki-ja/aijento/external-agent-access.md#path-a-let-your-ai-agent-configure-it-for-you) を Codex に送信します。
3. Codex が ACE Studio のインストールを自動検出し、MCP サーバーを `~/.codex/config.toml`に設定して、Codex と ChatGPT Work の両方でツールを利用できるようにします。

<figure><img src="https://82113185-files.gitbook.io/~/files/v0/b/gitbook-x-prod.appspot.com/o/spaces%2Fsn71WYzecYYQw3KkF40b%2Fuploads%2Fgit-blob-bd6c9b89980a8bc1e9538fce71dee76ac0d9f710%2Fchatgpt-desktop-mode-switcher.png?alt=media" alt="Mode selector in ChatGPT for desktop showing Codex"><figcaption><p>左上のモードセレクターで Codex に切り替えて、自動セットアップを実行します</p></figcaption></figure>

***

### ChatGPT Work を使用する場合

設定後は、 **Codex** モードで会話を続けるか、 **ChatGPT Work** 一般的な会話ワークフローには:

1. ChatGPT アプリのメインチャットビューに切り替えます。
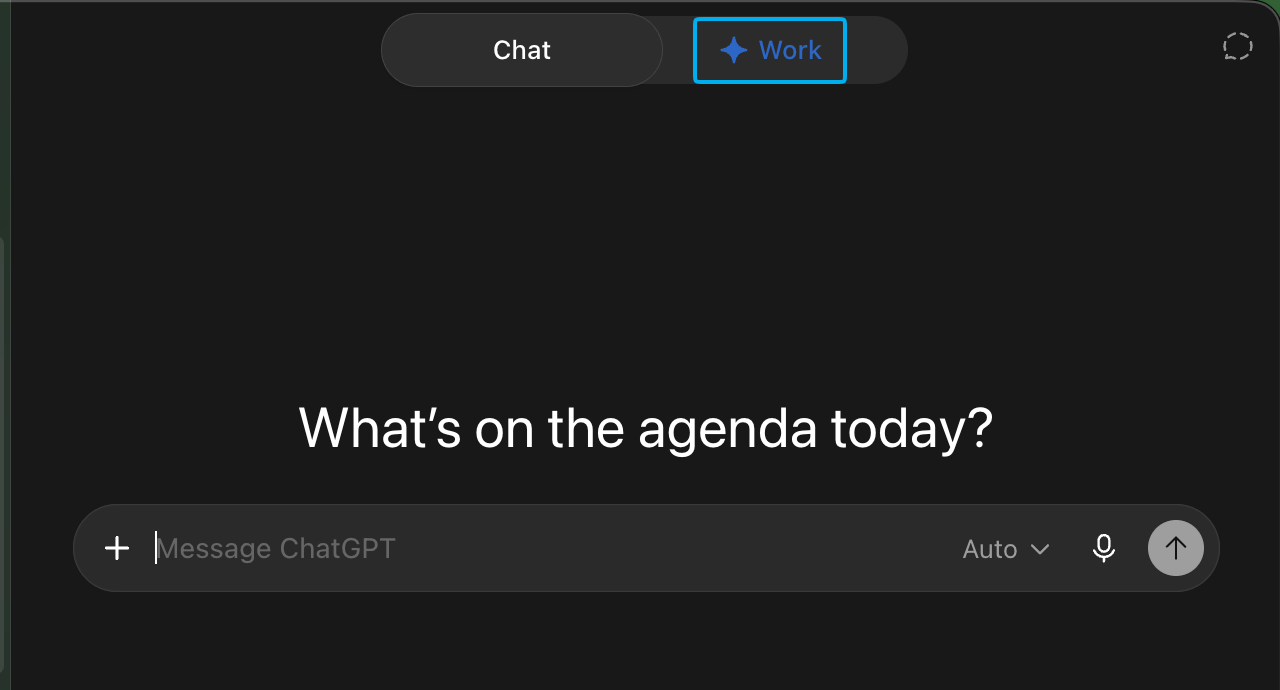
2. ウィンドウ下部のコンポーザーで、 **Work** トグルボタンをクリックしてローカルツールとコンピューターアクセスを有効にします。
3. 以下が表示されます: **ACE Studio** がアクティブになり、音楽プロジェクトのサポート準備が整います。

<figure><img src="https://82113185-files.gitbook.io/~/files/v0/b/gitbook-x-prod.appspot.com/o/spaces%2Fsn71WYzecYYQw3KkF40b%2Fuploads%2Fgit-blob-344f4119c65e227b3f266921317c10f6851707c0%2Fchatgpt-desktop-work-mode-toggle.png?alt=media" alt="Toggle Work mode in ChatGPT prompt bar"><figcaption><p>コンポーザープロンプトバーの「Work」をクリックして、ローカルツールを有効にします</p></figcaption></figure>

***

### 代替方法: 設定から手動セットアップ

グラフィカルインターフェースから手動でサーバーを設定する場合は、次の手順に従ってください:

#### 手順 1: 設定を開く

開く **設定** ChatGPT で:

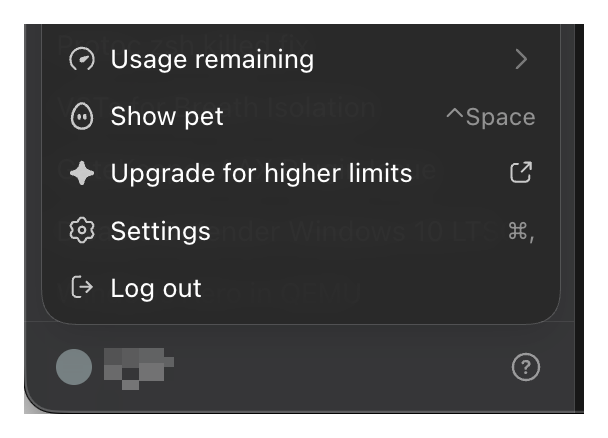
* 左下のプロフィールアバターをクリックし、次を選択します: **設定**、または
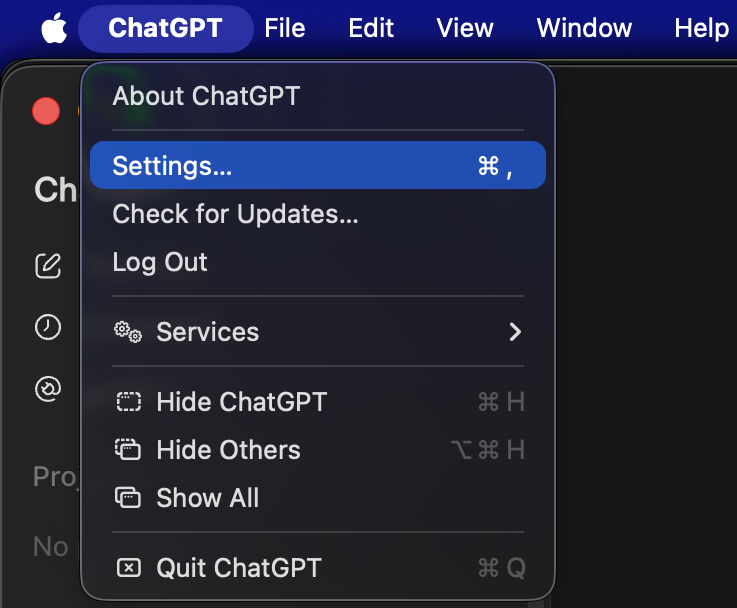
* アプリメニューを使用する場合： **ChatGPT → 設定...** (`Cmd+,` を macOS で、または `Ctrl+,` （Windows では）。

{% tabs %}
{% tab title="プロフィールメニュー" %}

<figure><img src="https://82113185-files.gitbook.io/~/files/v0/b/gitbook-x-prod.appspot.com/o/spaces%2Fsn71WYzecYYQw3KkF40b%2Fuploads%2Fgit-blob-c73bd2c570889b3f528a729ea60e541a1823903a%2Fchatgpt-desktop-open-settings-profile.png?alt=media" alt="Open Settings from user profile menu"><figcaption><p>左下のプロフィールメニューから設定にアクセス</p></figcaption></figure>
{% endtab %}

{% tab title="アプリケーションメニュー（macOS）" %}

<figure><img src="https://82113185-files.gitbook.io/~/files/v0/b/gitbook-x-prod.appspot.com/o/spaces%2Fsn71WYzecYYQw3KkF40b%2Fuploads%2Fgit-blob-727975c5c9453671b9629dcef860e0870ee1a827%2Fchatgpt-desktop-open-settings-macos.png?alt=media" alt="Open Settings from macOS app menu"><figcaption><p>macOS のメニューバーから設定にアクセス</p></figcaption></figure>
{% endtab %}
{% endtabs %}

***

#### 手順 2: MCP サーバー設定を開く

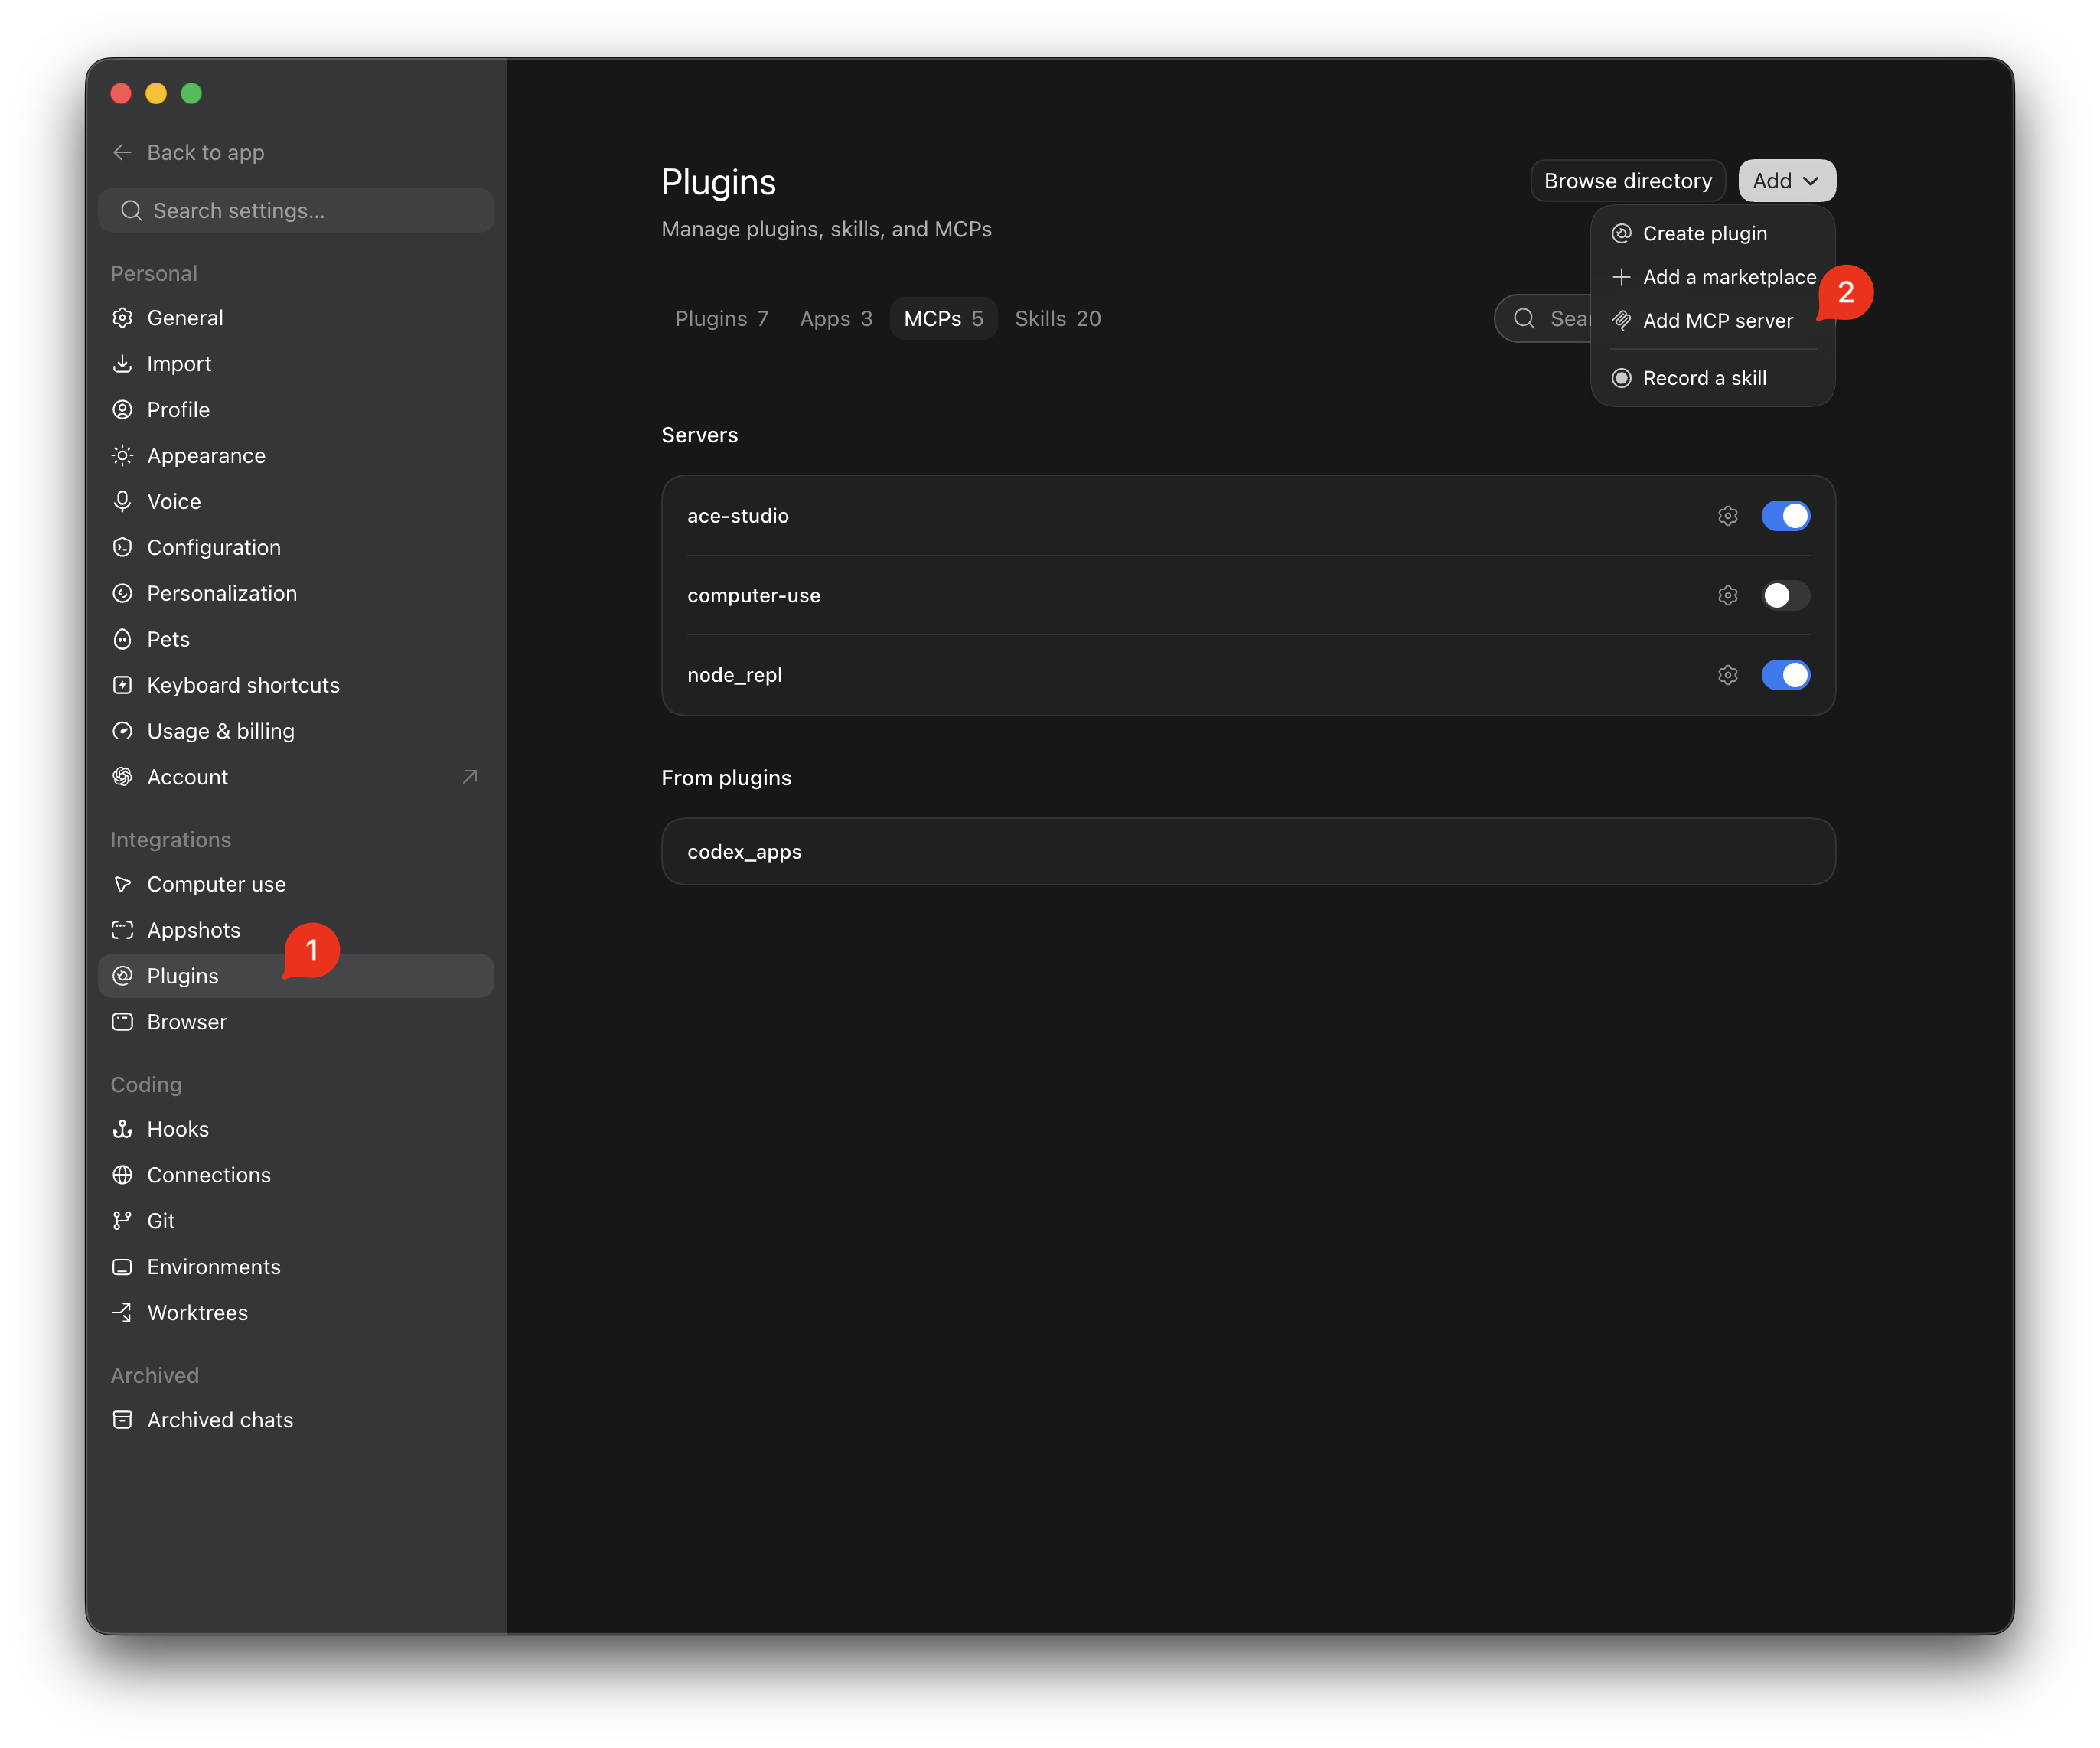
1. 設定ウィンドウで、次へ移動します **プラグイン** の下の **連携** セクション。
2. 「 **追加** ボタンを右上でクリックし、次を選択します: **MCP サーバーを追加**.

*（ **MCP** タブに切り替えて、以前追加したサーバーを表示または管理することもできます。）*

<figure><img src="https://82113185-files.gitbook.io/~/files/v0/b/gitbook-x-prod.appspot.com/o/spaces%2Fsn71WYzecYYQw3KkF40b%2Fuploads%2Fgit-blob-32323cae32c3d154472d427b9348d229ba8d402e%2Fchatgpt-desktop-settings-plugins-add.png?alt=media" alt="Integrations Plugins settings with Add MCP Server menu"><figcaption><p>連携 → プラグイン の下にある「MCP サーバーを追加」を選択します</p></figcaption></figure>

***

#### 手順 3: ACE Studio の MCP サーバーを追加

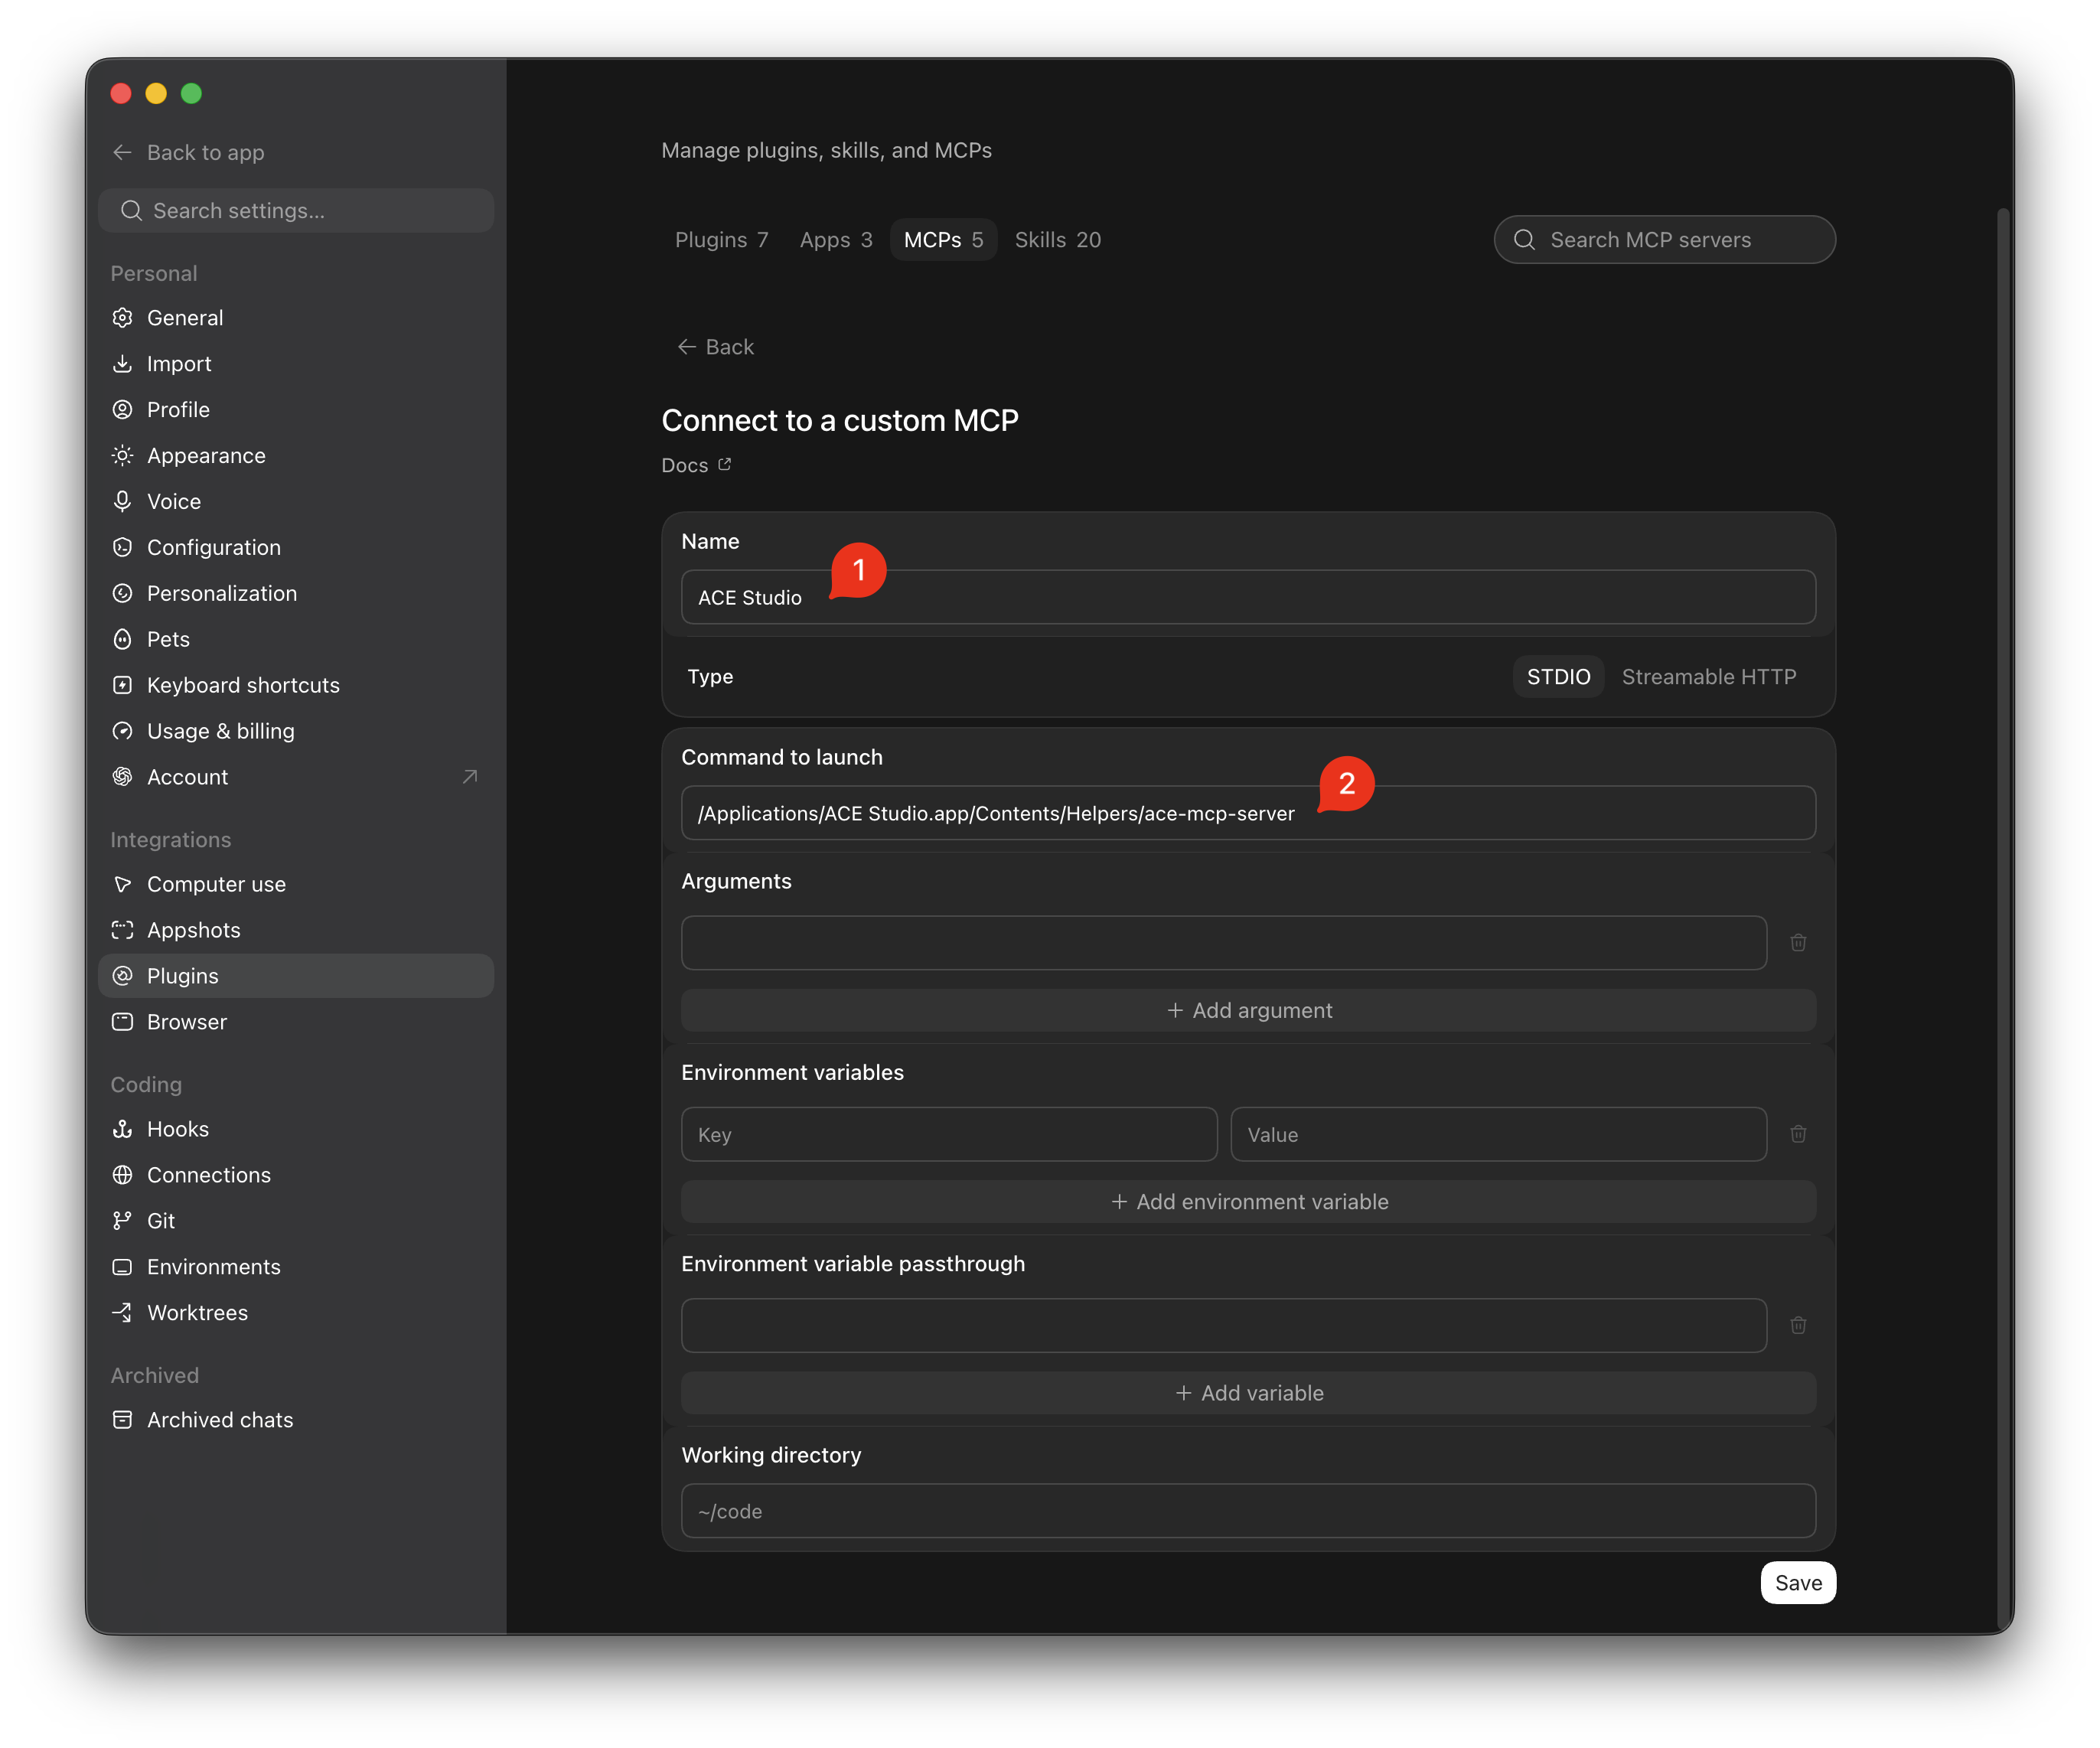
次の **MCP サーバーを追加** ダイアログで、サーバー情報を入力します:

1. **名前:** Enter `ACE Studio` （または `acestudio`).
2. **種類:** 維持する **STDIO** 選択済み *（デフォルト）*.
3. **起動コマンド:** ACE Studio で、次を開きます **設定 → 一般 → 外部エージェントアクセス**上に配置したら、 **コマンドをコピー** の横にある **MCP サーバー（stdio）**&#x306B;、正確なコマンドを貼り付けます。
4. クリック **保存**.

<figure><img src="https://82113185-files.gitbook.io/~/files/v0/b/gitbook-x-prod.appspot.com/o/spaces%2Fsn71WYzecYYQw3KkF40b%2Fuploads%2Fgit-blob-32124bf920da85e0990584a8d8c5ea4086ee22da%2Fchatgpt-desktop-add-mcp-server.png?alt=media" alt="Add MCP Server dialog with ACE Studio STDIO configuration"><figcaption><p>MCP サーバーの詳細を入力し、「保存」をクリックします</p></figcaption></figure>

{% hint style="info" %}
**共有 Codex 設定:**\
デスクトップ UI から追加したサーバーは、ローカルの Codex 設定（`~/.codex/config.toml`）に保存されるため、ACE Studio を ChatGPT Work、Codex CLI、Codex IDE 拡張機能のすべてから同時に利用できます。
{% endhint %}

***

### 手順 4: 確認して使用を開始

1. 切り替えて **Codex** モード、または **Work** が ChatGPT で有効になっていることを確認してください。
2. ACE Studio が起動していることを確認してから、次のように依頼してください:

```
現在の ACE Studio プロジェクト情報を確認してください
```

ChatGPT はローカル MCP サーバー経由で ACE Studio に接続し、開いているプロジェクトを確認して、その詳細（テンポ、調号、トラック、クリップ）を返します。


---

# Agent Instructions
This documentation is published with GitBook. GitBook is the documentation platform designed so that both humans and AI agents can read, navigate, and reason over technical content effectively. Learn more at gitbook.com.

## Querying This Documentation
If you need additional information that is not directly available in this page, you can query the documentation dynamically by asking a question.

Perform an HTTP GET request on the current page URL with the `ask` query parameter, and the optional `goal` query parameter:

```
GET https://docs.acestudio.ai/docs/product-wiki-ja/aijento/external-agent-access/chatgpt-for-desktop.md?ask=<question>&goal=<endgoal>
```

`ask` is the immediate question: it should be specific, self-contained, and written in natural language.
`goal` is optional and describes the broader end goal you are ultimately trying to accomplish on behalf of the user. GitBook uses it to tailor the answer towards what is most useful for that goal.

The response will contain a direct answer to the question and relevant excerpts and sources from the documentation.

Use this mechanism when the answer is not explicitly present in the current page, you need clarification or additional context, or you want to retrieve related documentation sections.