> For the complete documentation index, see [llms.txt](https://docs.acestudio.ai/llms.txt). Markdown versions of documentation pages are available by appending `.md` to page URLs; this page is available as [Markdown](https://docs.acestudio.ai/ai-tools/music-video/creating-a-promo-clip.md).
# Creating a Promo Clip
Turn one section of your song into a short, social-ready clip — for Reels, TikTok, Shorts, and more — at a fraction of the cost of a full video.
A Promo Clip is a short music video made from a single section of your song — built for Instagram Reels, TikTok, YouTube Shorts, and other social posts. It's the same [Director](/ai-tools/music-video.md#your-director) and the same production quality as a full video, but scoped to one section: from 500+ credits instead of 25k+.
## How to Create a Promo Clip
### 1. Start Your Session
Open your project in ACE Studio — a song you produced, or a finished track you imported into an empty project. Click Music Video in the top-right corner, make sure your music is in place on the [Canvas](/project/arrangement-in-canvas/canvas.md), and click Start Session. (Same entry as a full production — see [Creating a Music Video](https://docs.acestudio.ai/ai-tools/music-video/pages/0yYqquEvegdsKXWLnzaL#1.-start-your-session) for details.)
### 2. Choose "Promo Clip"
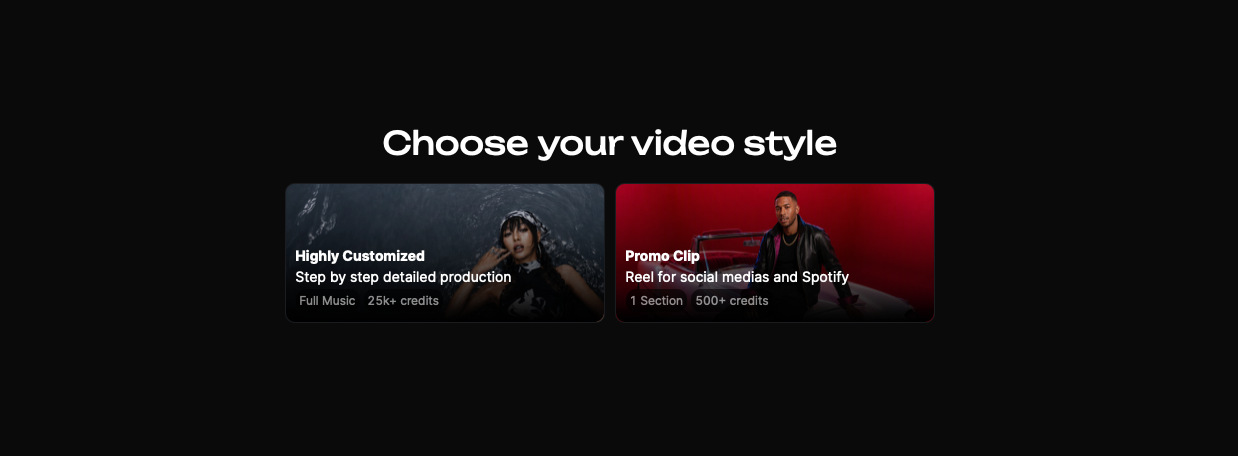
On the "Choose your video style" screen, select **Promo Clip**.
Choose Promo Clip
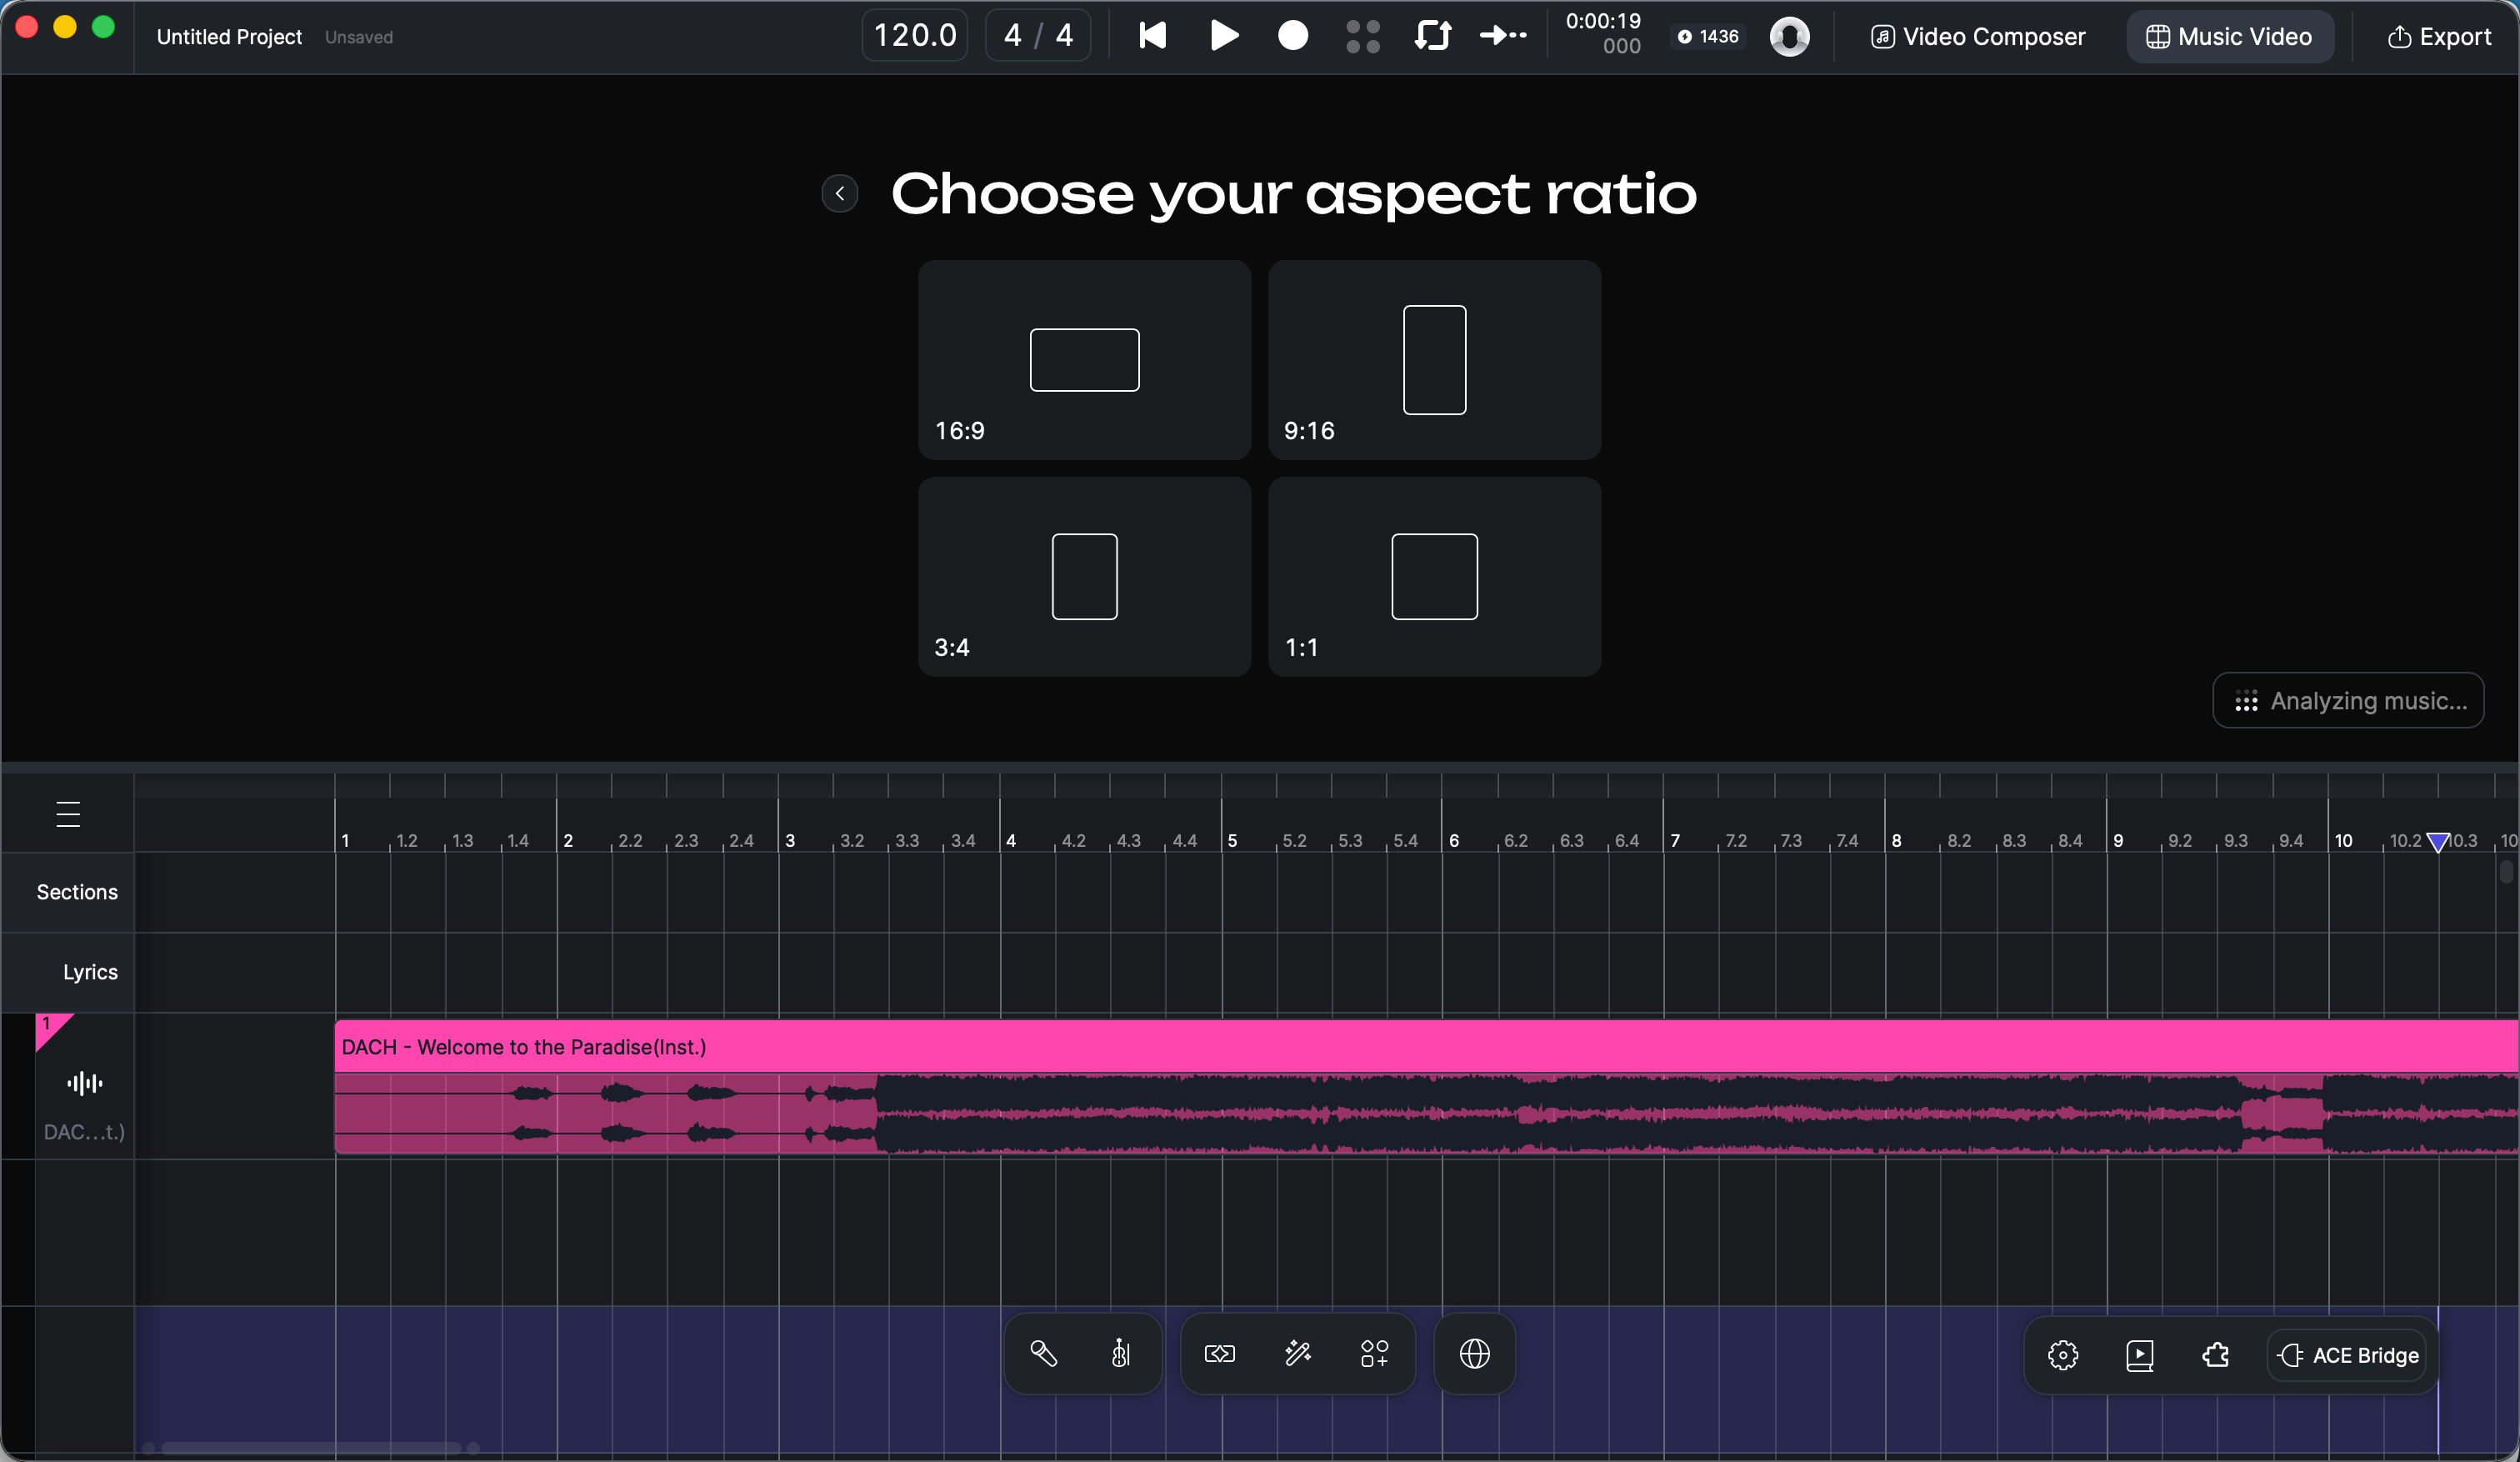
### 3. Choose Your Aspect Ratio
Pick the format that fits where you'll post it:
* **9:16** — Instagram Reels, TikTok, YouTube Shorts
* **16:9** — YouTube, landscape posts
* **1:1** — Instagram feed, X (Twitter)
* **3:4** — Pinterest, some Instagram formats
Choose your aspect ratio
### 4. Describe Your Idea
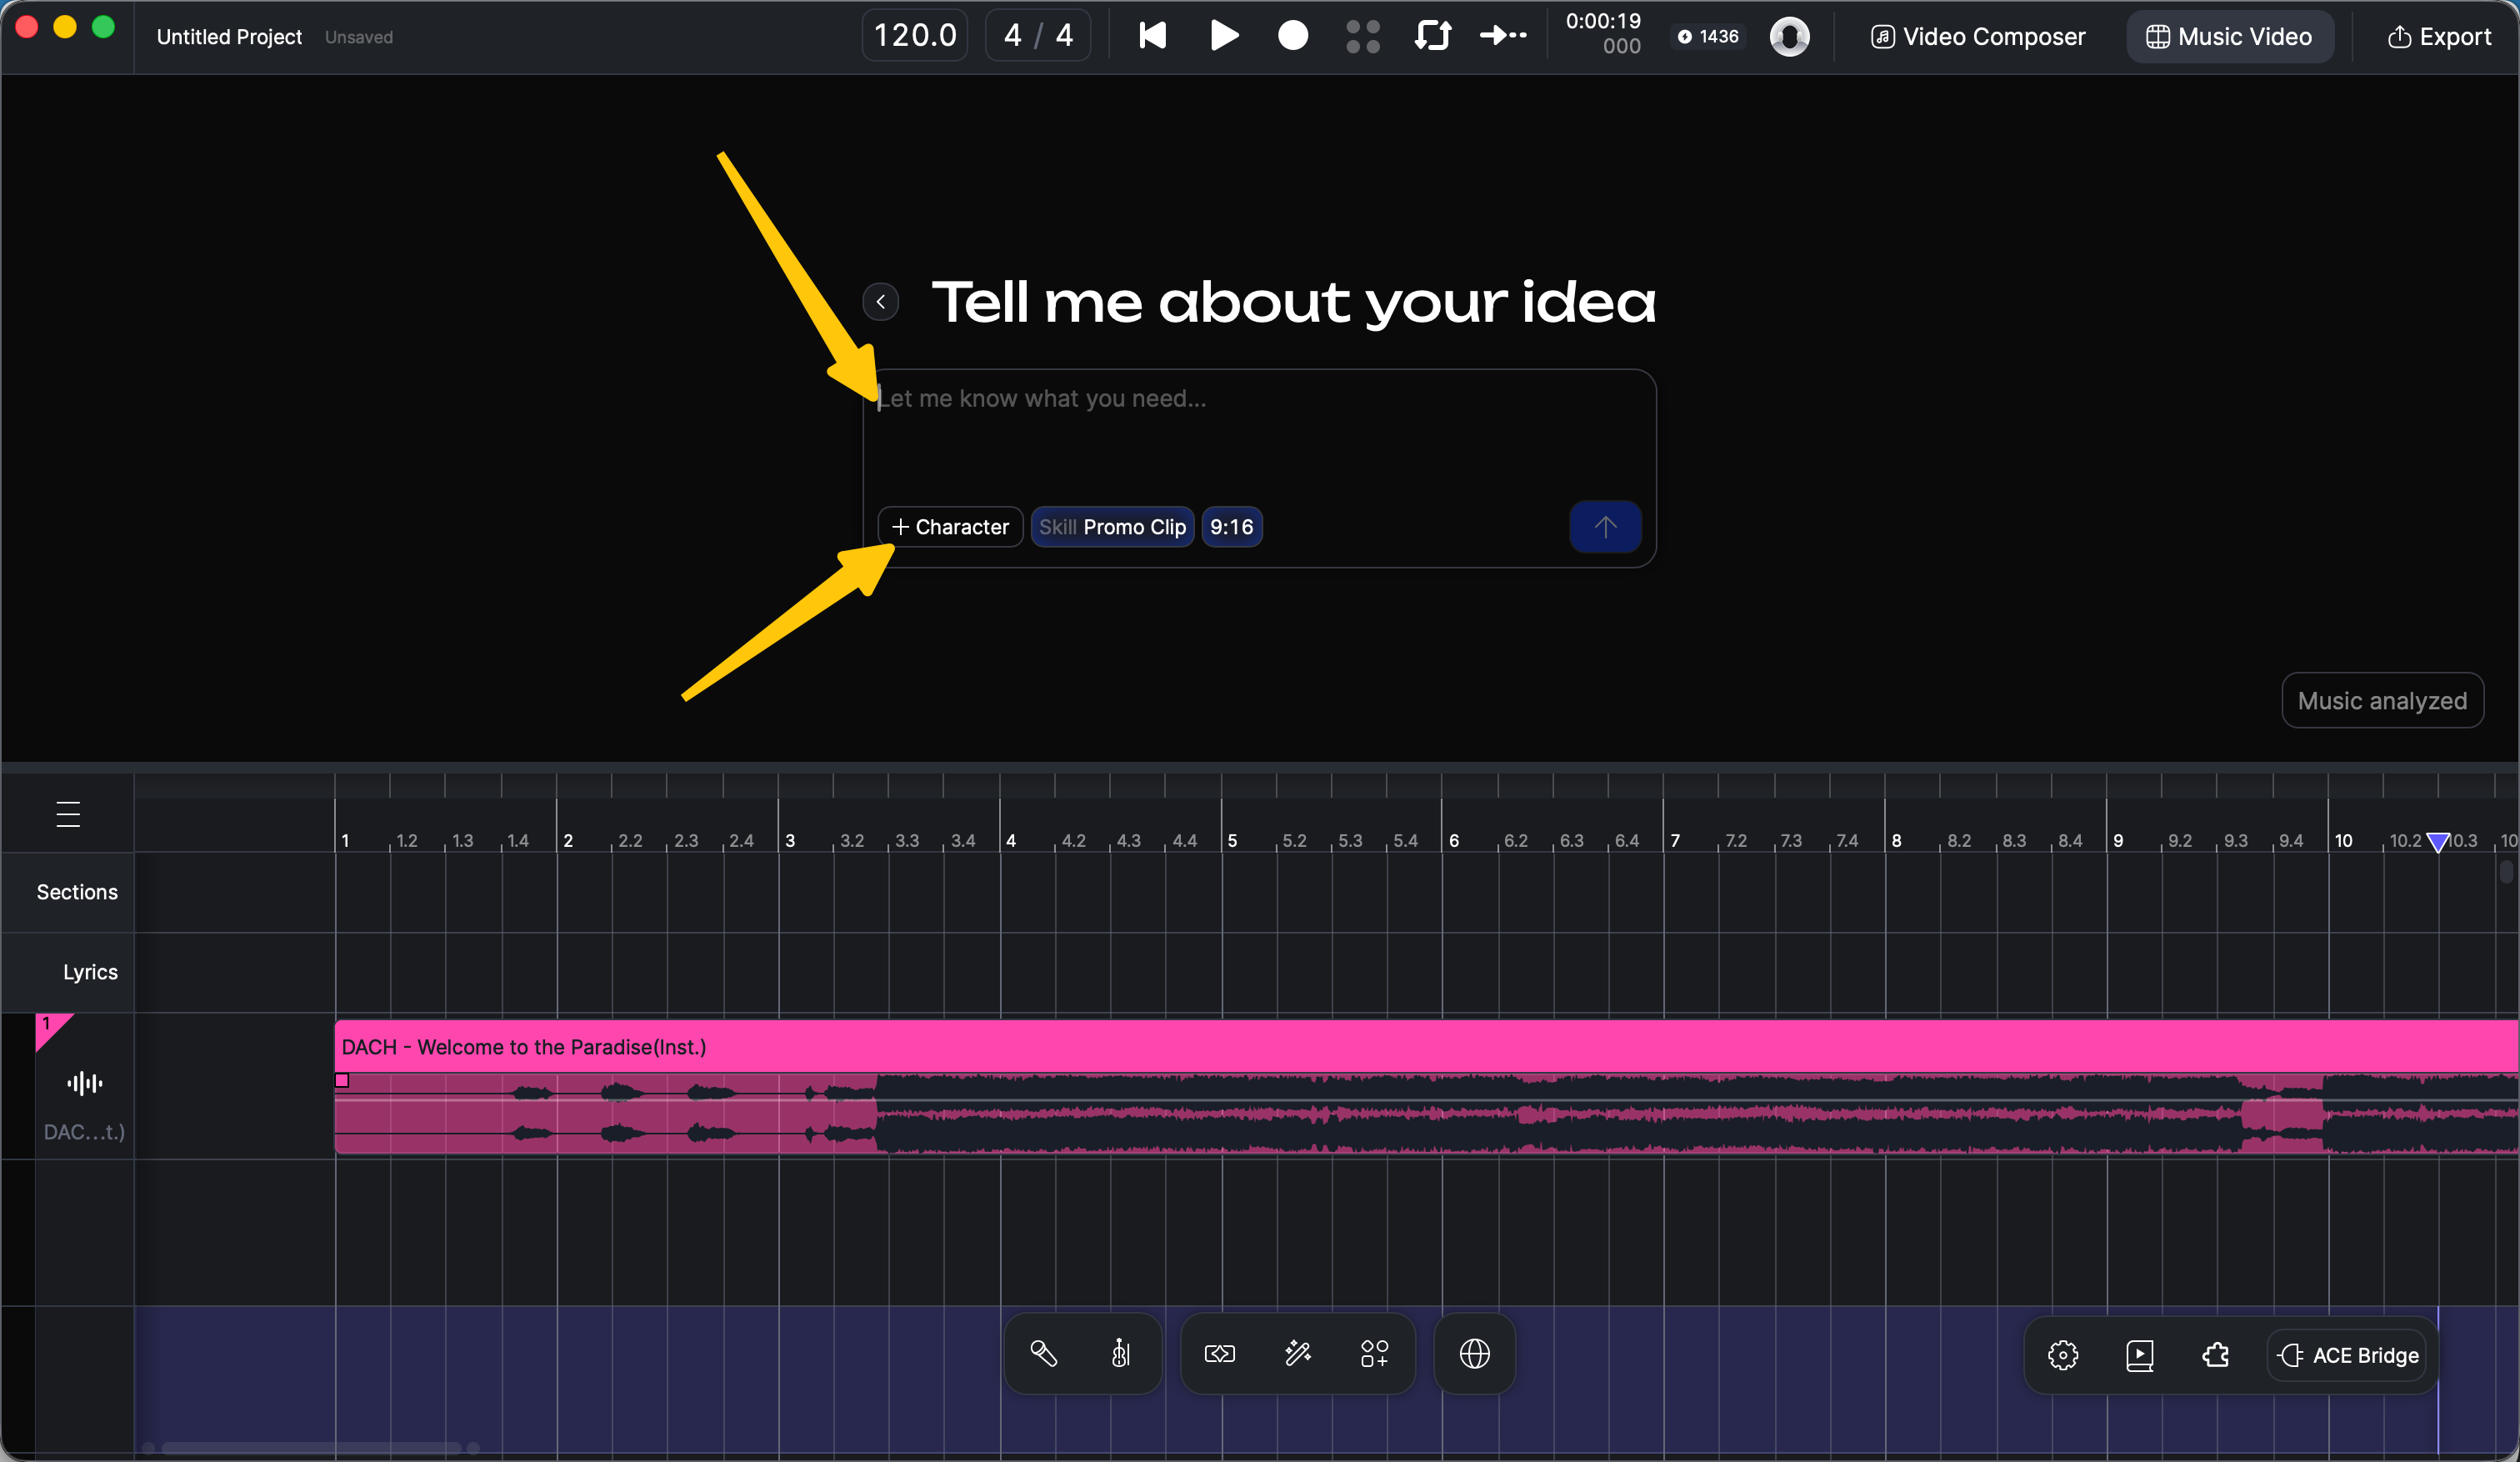
This is where you tell the Director what you want. Two things happen on this screen:
* **Describe your idea** (required) — the style and vibe you're going for. You can also describe a storyline, ask for choreography, or anything else — but always try to include a clear style reference; it makes a big difference in quality.
* **Upload a character** (optional but recommended) — click + Character to upload a reference image: your original character, a photo, your pet — any visual you want as the main subject of the clip.
Pairing a style with a scene or mood works especially well, for example:
* "Ghibli-style animation, a cat walking through a rainy town"
* "Tim Burton dark fantasy, gothic castle in the fog"
* "Vaporwave aesthetic with sunset gradients and marble statues"
Describe your idea — and optionally upload a character
### 5. Pick a Song Section
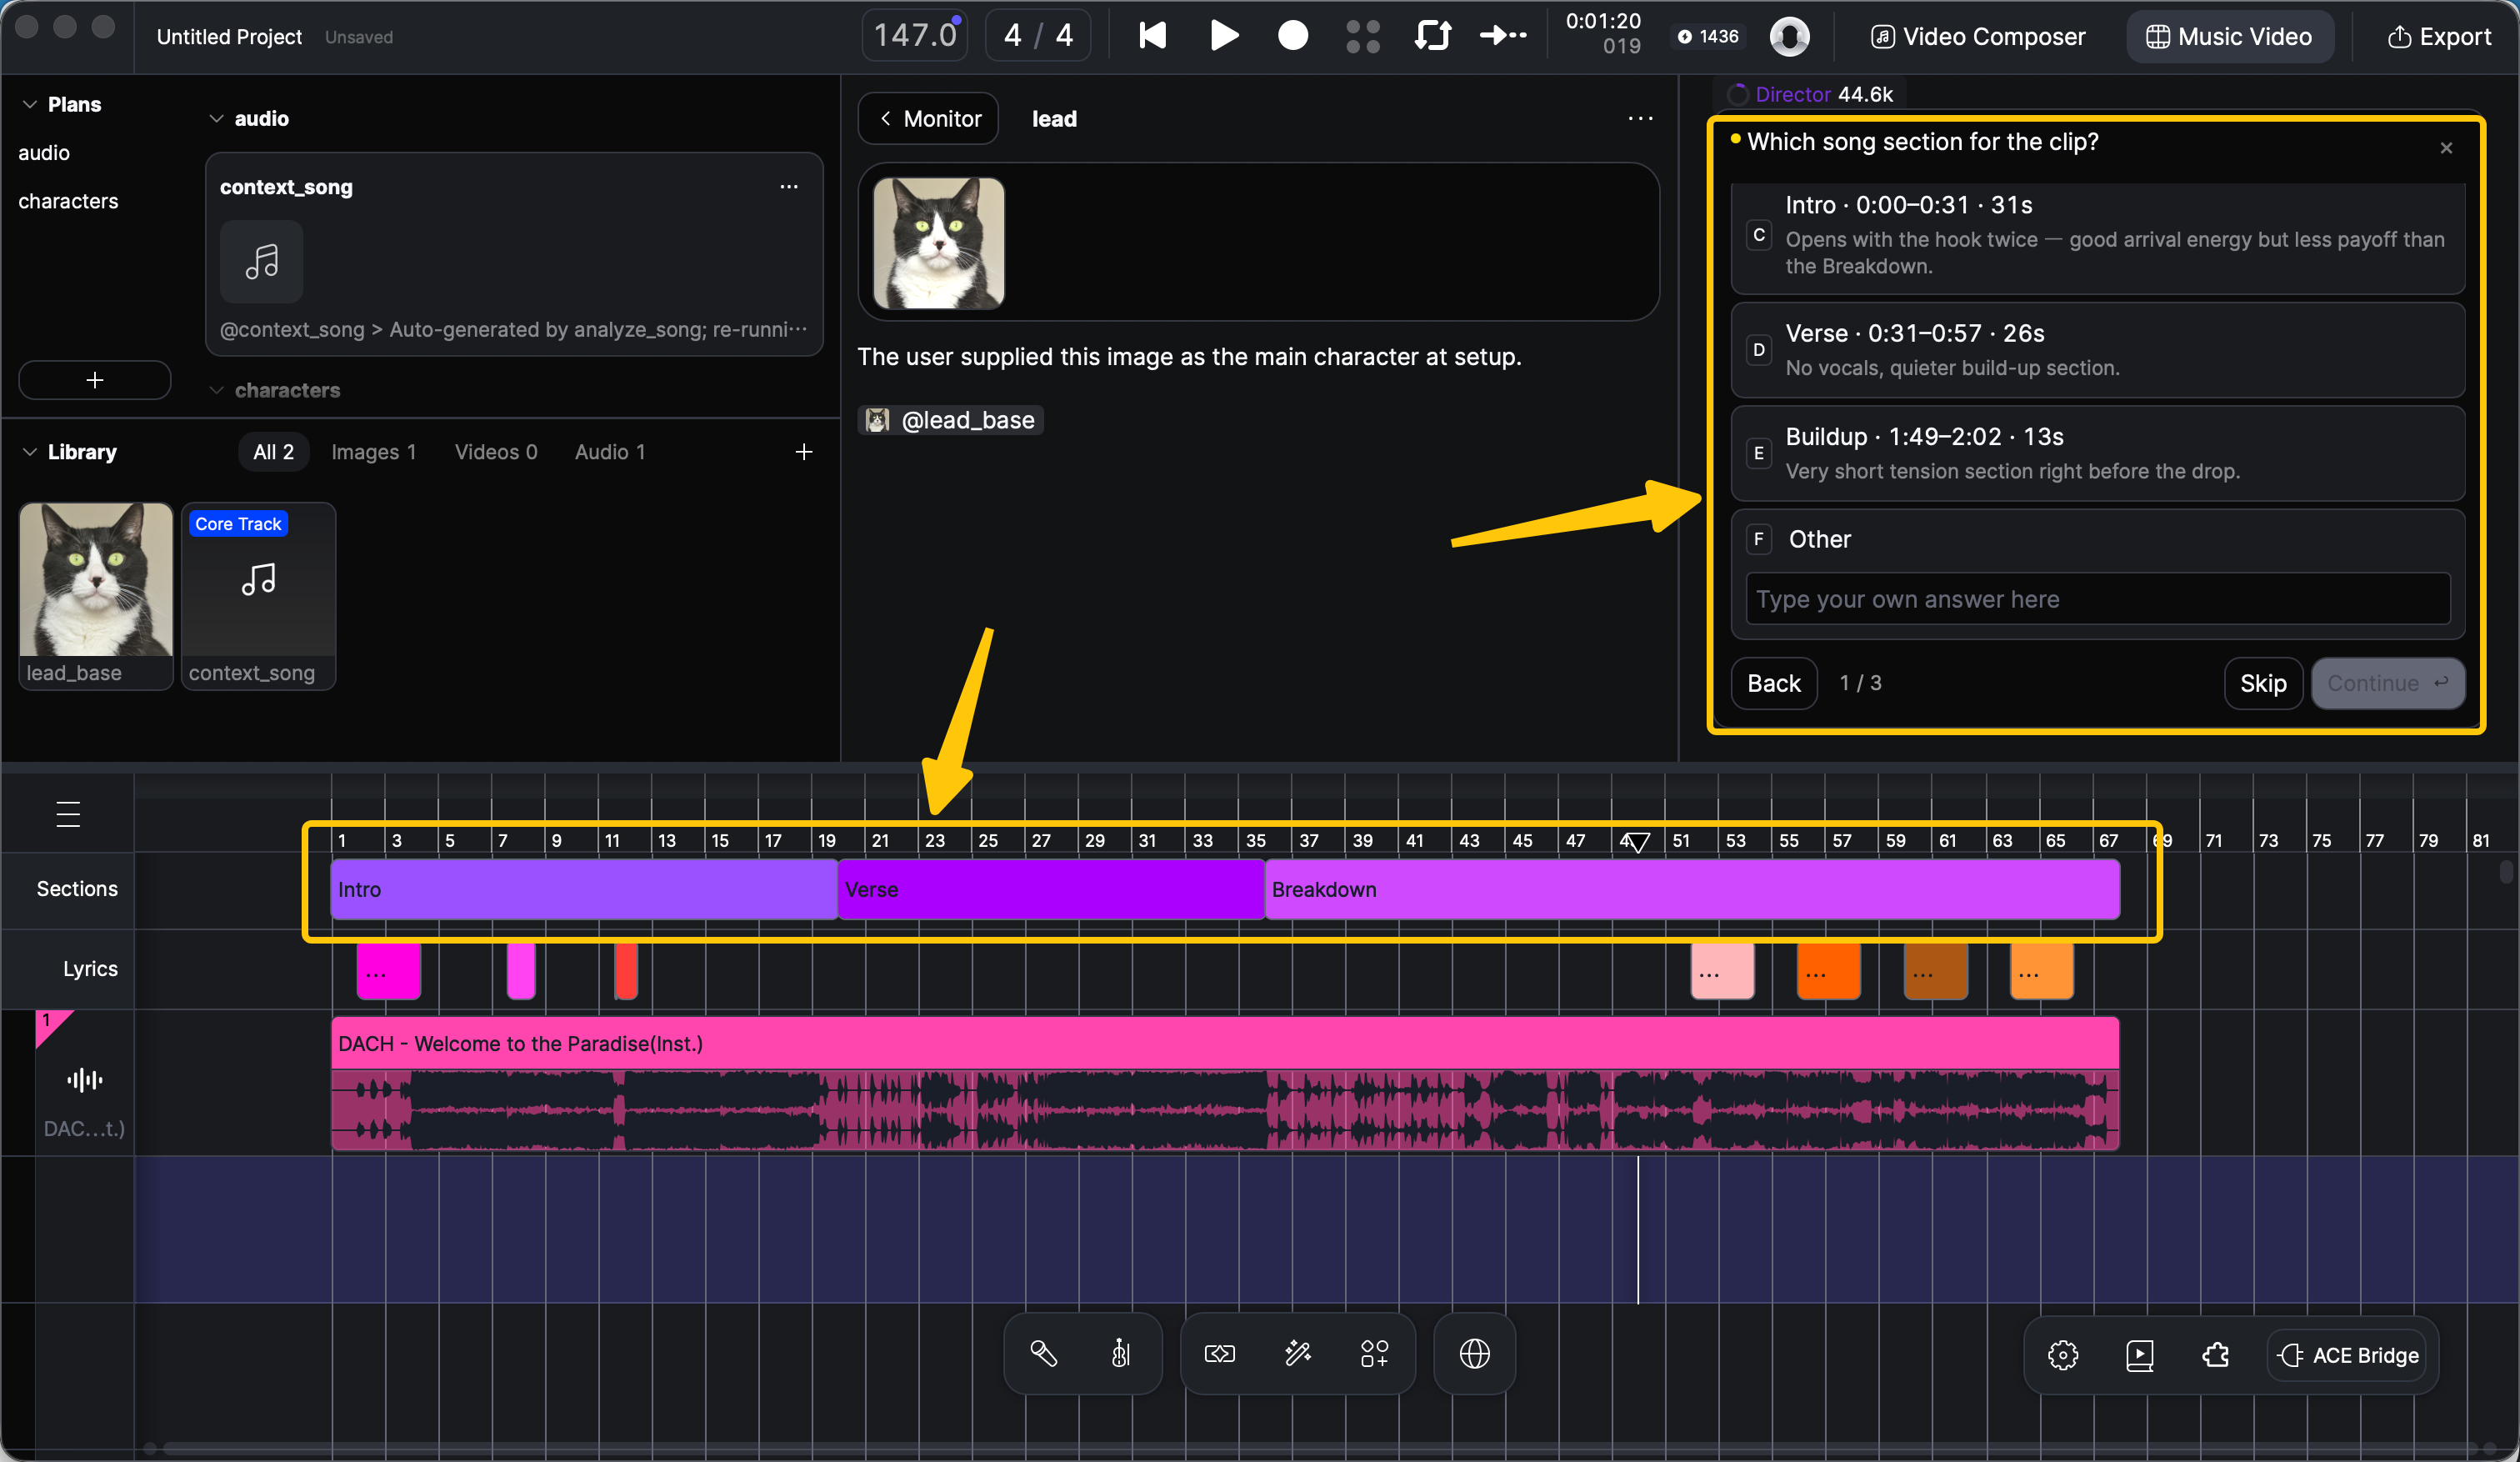
The Director analyzes your music and suggests sections for the clip, each with its time range and a note on how it feels — for example `Intro · 0:00–0:31`, `Verse · 0:31–0:57`, `Buildup · 1:49–2:02`. Pick whichever sounds best as a promo — usually a chorus or another high-energy part.
The Director suggests sections; the Sections row on the Canvas shows the analysis
{% hint style="warning" %}
Check the auto-segmentation before you choose. Look at the **Sections** row on the Canvas — the analysis might not have split your song perfectly. If the boundaries look off, adjust them directly on the Canvas, then choose **Other** and tell the Director, for example: "I've adjusted the segmentation. Please use Chorus 1 for the clip." See [Fixing Song Sections & Lyric Timing](/ai-tools/music-video/editing-and-iteration.md#how-to-fix-song-sections-and-lyric-timing).
{% endhint %}
### 6. Choose Your Video Model Early
Your model choice affects how the Director scripts the clip — different models allow different maximum shot lengths. If you already know your style, pick the model early; otherwise the default (MiniMax-H3) works great for most cases. See [Choosing a Video Model](/ai-tools/music-video.md#choosing-a-video-model) for the comparison.
You can switch models in the selector below the chat input, or just tell the Director which model to use.
### 7. Refine, Then Generate
From here, the Director guides you through the remaining steps — character design, scenes, storyboards — before generating the video.
One crucial tip: **fix every detail before video generation starts.** If a character design, a scene, or a color palette doesn't look right, say so immediately. Regenerating images at this stage is cheap; redoing video afterwards costs far more time and credits. When the Director shows you several versions of an image, browse them and pick your favorite — see [Browsing & Picking Image Versions](/ai-tools/music-video/editing-and-iteration.md#how-to-browse-and-pick-image-versions).
Once the clip is generated, watch it on the Canvas and export it like any other project — see [Export Files](/project/file-management/export-files.md). Then post it. 🎬
---
# Agent Instructions
This documentation is published with GitBook. GitBook is the documentation platform designed so that both humans and AI agents can read, navigate, and reason over technical content effectively. Learn more at gitbook.com.
## Querying This Documentation
If you need additional information that is not directly available in this page, you can query the documentation dynamically by asking a question.
Perform an HTTP GET request on the current page URL with the `ask` query parameter, and the optional `goal` query parameter:
```
GET https://docs.acestudio.ai/ai-tools/music-video/creating-a-promo-clip.md?ask=&goal=
```
`ask` is the immediate question: it should be specific, self-contained, and written in natural language.
`goal` is optional and describes the broader end goal you are ultimately trying to accomplish on behalf of the user. GitBook uses it to tailor the answer towards what is most useful for that goal.
The response will contain a direct answer to the question and relevant excerpts and sources from the documentation.
Use this mechanism when the answer is not explicitly present in the current page, you need clarification or additional context, or you want to retrieve related documentation sections.